How to use Firebase Realtime Database in Android
Please Subscribe Youtube| Like Facebook | Follow Twitter
For Kotlin follow this article
Introduction
In this article we will learn how to use firebase real time database in our app. The Firebase Realtime Database is a cloud-hosted database. Data is stored as JSON and synchronized in realtime to every connected client and remains available when your app goes offline.
Our Example
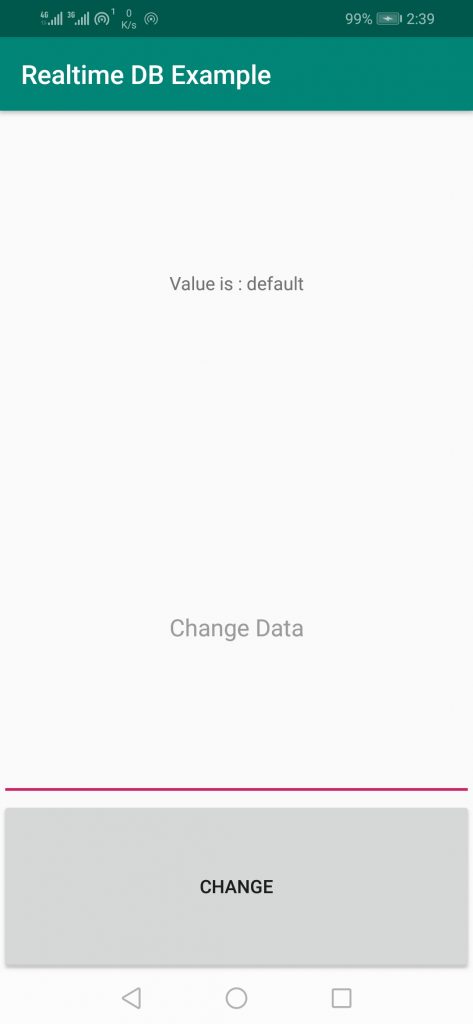
In our example we have textview “data” which displays/reads current value of realtime database node named “data”. We also have an edittext “change_data” which allows users to change value of data node at realtime db on a “change” button click, after changing its value in realtime database corresponding value will also be reflected inside “data” textview of all connected users.
Requirements:
- Android Project/App in which Realtime Database to be implemented
- Firebase Project
Note: First you need to create Firebase Project and then connect your app to it. You can follow this article to set it up.
Steps
Follow below steps
1) Create Realtime Database and data node in Firebase.
2) Integrate and Code Firebase Realtime Database in your app
3) Run and test your app
1) Create Realtime Database and data node in Firebase.
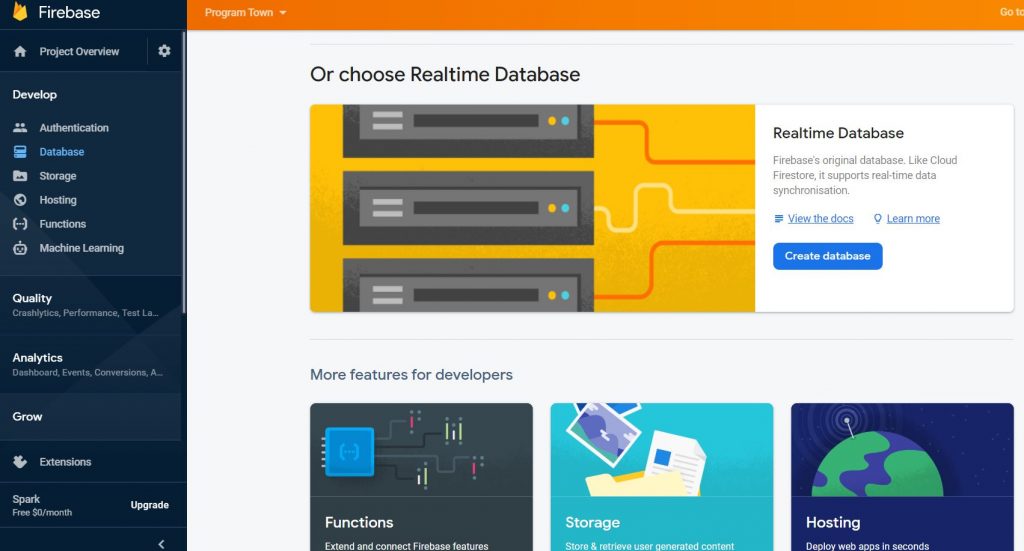
First go to Firebase and open your Firebase Project and click on Database and then click on Create Database under Realtime Database Heading.
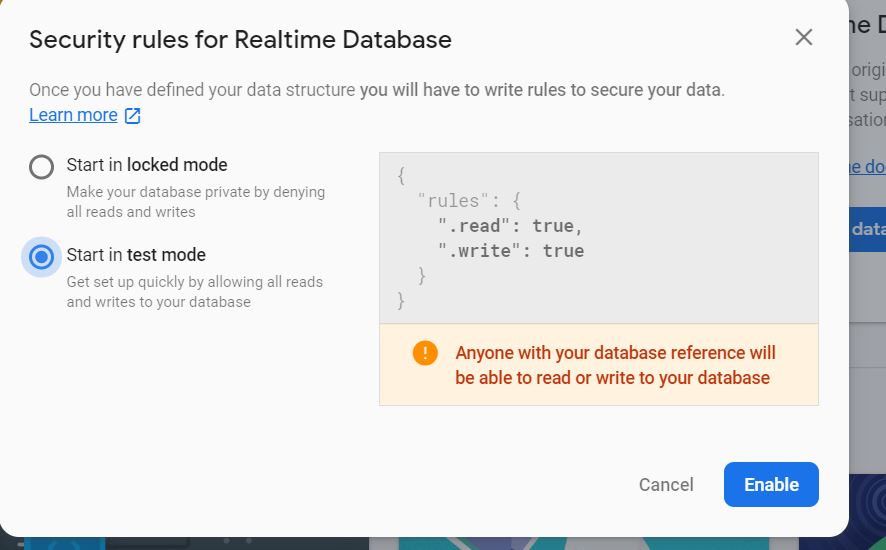
Start in test mode during testing, which allows anyone who have your db reference to read and write data to your database. During real time development or production impose security rules by using firebase authentication according to your requirements
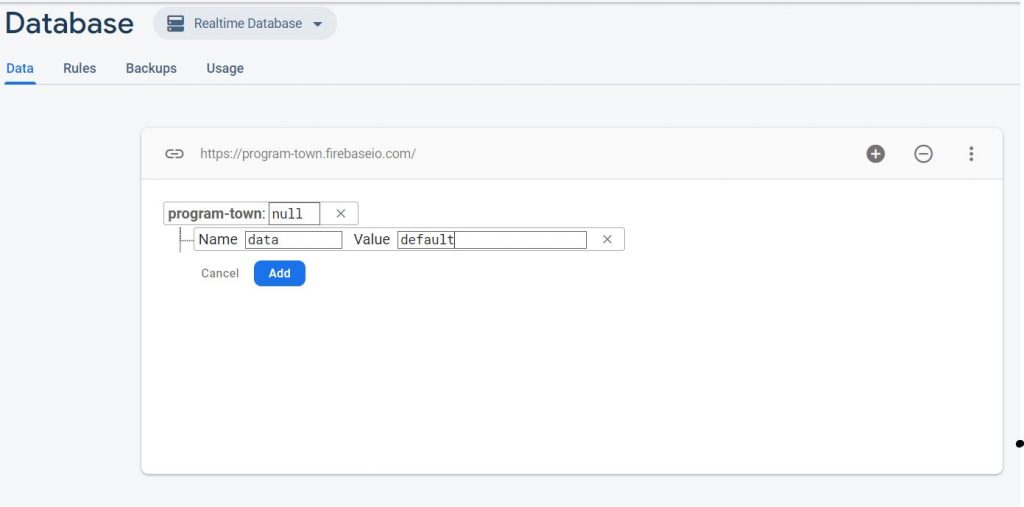
After creating Database, create a node named data and assign its value “default”
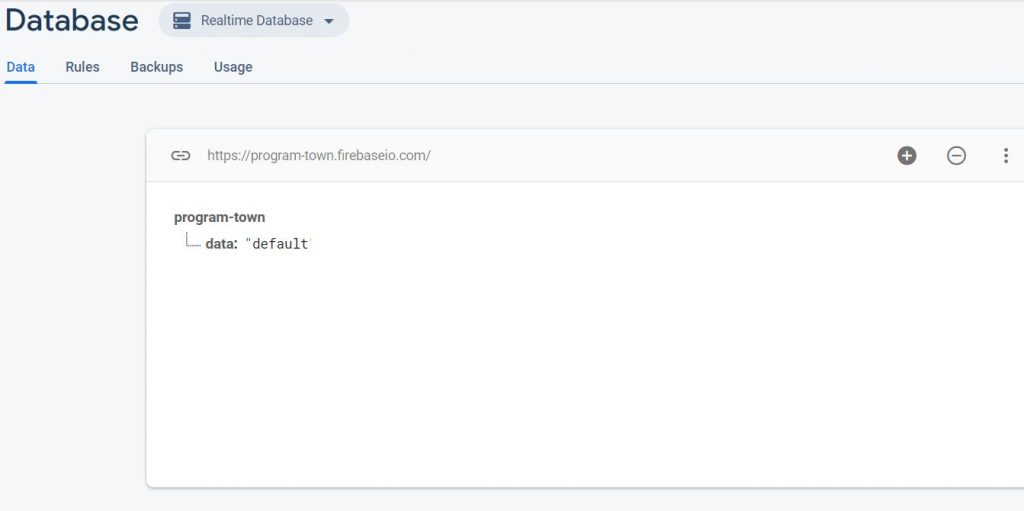
2) Integrate and Code Firebase Realtime Database in your app
First add firebase realtime database library at app level build.gradle file
implementation 'com.google.firebase:firebase-database:19.3.0'Layout file conatins textview, edittext and button below is xml code.
<?xml version="1.0" encoding="utf-8"?>
<LinearLayout xmlns:android="http://schemas.android.com/apk/res/android"
    xmlns:app="http://schemas.android.com/apk/res-auto"
    xmlns:tools="http://schemas.android.com/tools"
    android:layout_width="match_parent"
    android:layout_height="match_parent"
    tools:context=".MainActivity"
    android:orientation="vertical"
    >

    <TextView
        android:id="@+id/data"
        android:layout_width="match_parent"
        android:layout_height="0dp"
        android:layout_weight="1"
        android:text="Value is : "
        android:gravity="center"
        />
    <EditText
        android:id="@+id/change_data"
        android:layout_width="match_parent"
        android:layout_height="0dp"
        android:layout_weight="1"
        android:text=""
        android:hint="Change Data"
        android:gravity="center"
        />
    <Button
        android:id="@+id/change"
        android:layout_width="match_parent"
        android:layout_height="0dp"
        android:layout_weight="0.5"
        android:text="change"
        android:onClick="change"
        />

</LinearLayout>
Inside oncreate() method we have first created Firebase Realtime Database object inside db varaiable and got reference to data node inside dataNodeRef varaiable. dataNodeRef variable corresponds to data node inside firebase database which we have created in first step.
db=FirebaseDatabase.getInstance();
dataNodeRef=db.getReference("data");
addValueEventListener is added to dataNodeRef, which will call onDataChange() whenever dataNodeRef(data) value is changed. Inside onDataChange() we will set that value to our data textview.
dataNodeRef.addValueEventListener(new ValueEventListener() {
    @Override
    public void onDataChange(@NonNull DataSnapshot dataSnapshot) {
        if(dataSnapshot.exists())
        data.setText("Value is : "+dataSnapshot.getValue());
    }
    @Override
    public void onCancelled(@NonNull DatabaseError databaseError) {

    }
});
change() method will be called when change button is clicked. It will get current value of our change_data edittext and set that value to our dataNodeRef(data). Thus dataNodeRef(data) value can be changed by any user by clicking change button and its value will be synced across all our connected user and will be displayed inside data textview as well inside data node of firebase database.
public void change(View view) {
    dataNodeRef.setValue(changeData.getText().toString());
    changeData.setText("");
}
Whole Code
App level build.gradle
apply plugin: 'com.android.application'
// Add this line
apply plugin: 'com.google.gms.google-services'
android {
    compileSdkVersion 28
    buildToolsVersion "29.0.3"
    defaultConfig {
        applicationId "com.programtown.example"
        minSdkVersion 17
        targetSdkVersion 28
        versionCode 1
        versionName "1.0"
        testInstrumentationRunner "androidx.test.runner.AndroidJUnitRunner"
    }
    buildTypes {
        release {
            minifyEnabled false
            proguardFiles getDefaultProguardFile('proguard-android-optimize.txt'), 'proguard-rules.pro'
        }
    }
}

dependencies {
    implementation fileTree(dir: 'libs', include: ['*.jar'])
    implementation 'androidx.appcompat:appcompat:1.0.2'
    implementation 'androidx.constraintlayout:constraintlayout:1.1.3'
    testImplementation 'junit:junit:4.12'
    androidTestImplementation 'androidx.test.ext:junit:1.1.0'
    androidTestImplementation 'androidx.test.espresso:espresso-core:3.1.1'

    implementation 'com.google.firebase:firebase-database:19.3.0'
}
activity_main.xml
<?xml version="1.0" encoding="utf-8"?>
<LinearLayout xmlns:android="http://schemas.android.com/apk/res/android"
    xmlns:app="http://schemas.android.com/apk/res-auto"
    xmlns:tools="http://schemas.android.com/tools"
    android:layout_width="match_parent"
    android:layout_height="match_parent"
    tools:context=".MainActivity"
    android:orientation="vertical"
    >

    <TextView
        android:id="@+id/data"
        android:layout_width="match_parent"
        android:layout_height="0dp"
        android:layout_weight="1"
        android:text="Value is : "
        android:gravity="center"
        />
    <EditText
        android:id="@+id/change_data"
        android:layout_width="match_parent"
        android:layout_height="0dp"
        android:layout_weight="1"
        android:text=""
        android:hint="Change Data"
        android:gravity="center"
        />
    <Button
        android:id="@+id/change"
        android:layout_width="match_parent"
        android:layout_height="0dp"
        android:layout_weight="0.5"
        android:text="change"
        android:onClick="change"
        />

</LinearLayout>
MainActivity.java
package com.programtown.example;

import androidx.annotation.NonNull;
import androidx.appcompat.app.AppCompatActivity;
import android.os.Bundle;
import android.view.View;
import android.widget.EditText;
import android.widget.TextView;
import com.google.firebase.database.DataSnapshot;
import com.google.firebase.database.DatabaseError;
import com.google.firebase.database.DatabaseReference;
import com.google.firebase.database.FirebaseDatabase;
import com.google.firebase.database.ValueEventListener;

public class MainActivity extends AppCompatActivity {

    TextView data;
    EditText changeData;
    FirebaseDatabase db;
    DatabaseReference dataNodeRef;
    @Override
    protected void onCreate(Bundle savedInstanceState) {
        super.onCreate(savedInstanceState);
        setContentView(R.layout.activity_main);

        data = (TextView) findViewById(R.id.data);
        changeData = (EditText) findViewById(R.id.change_data);

        db=FirebaseDatabase.getInstance();
        dataNodeRef=db.getReference("data");

        dataNodeRef.addValueEventListener(new ValueEventListener() {
            @Override
            public void onDataChange(@NonNull DataSnapshot dataSnapshot) {
                if(dataSnapshot.exists())
                data.setText("Value is : "+dataSnapshot.getValue());
            }
            @Override
            public void onCancelled(@NonNull DatabaseError databaseError) {

            }
        });
    }

    public void change(View view) {
        dataNodeRef.setValue(changeData.getText().toString());
        changeData.setText("");
    }
}
3) Run and test your app
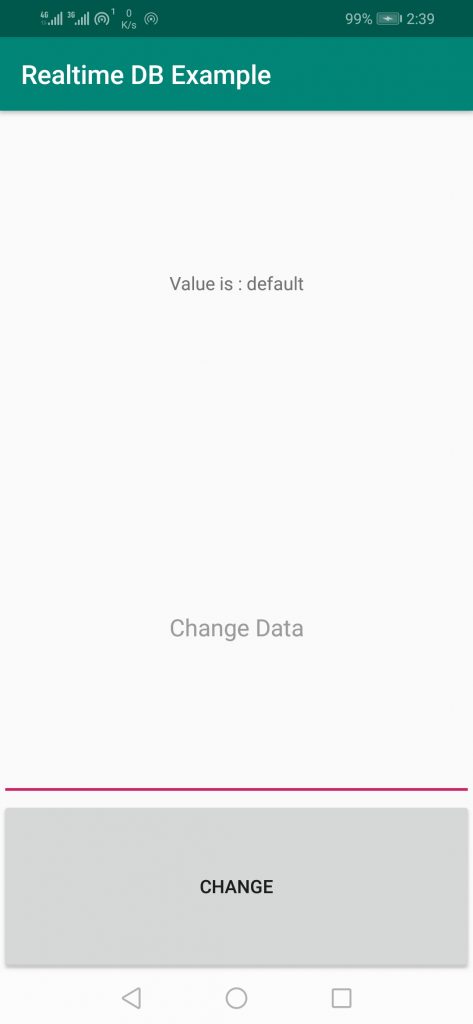
On first app launch initially value of data textview will be default.
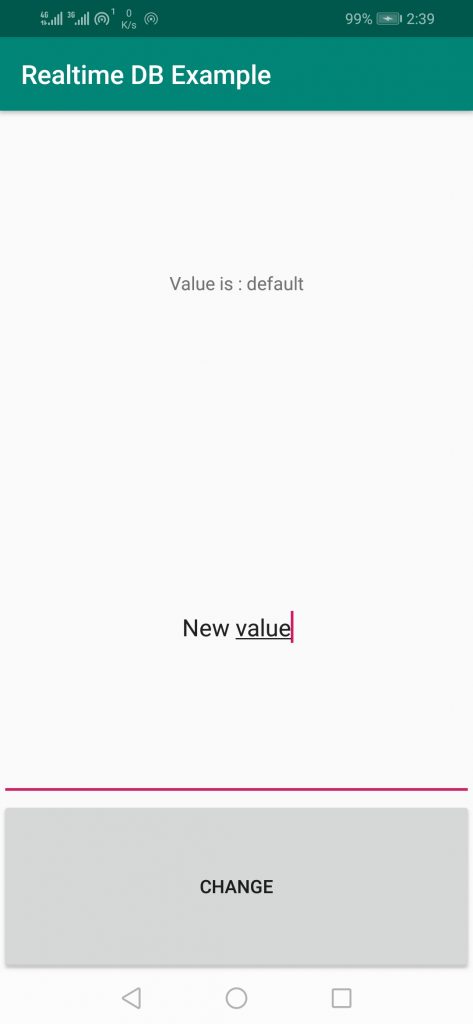
After changing edittext value to “New value” and clicking on change button, data textview value as well as realtime database node data value will be changed to “New value”.
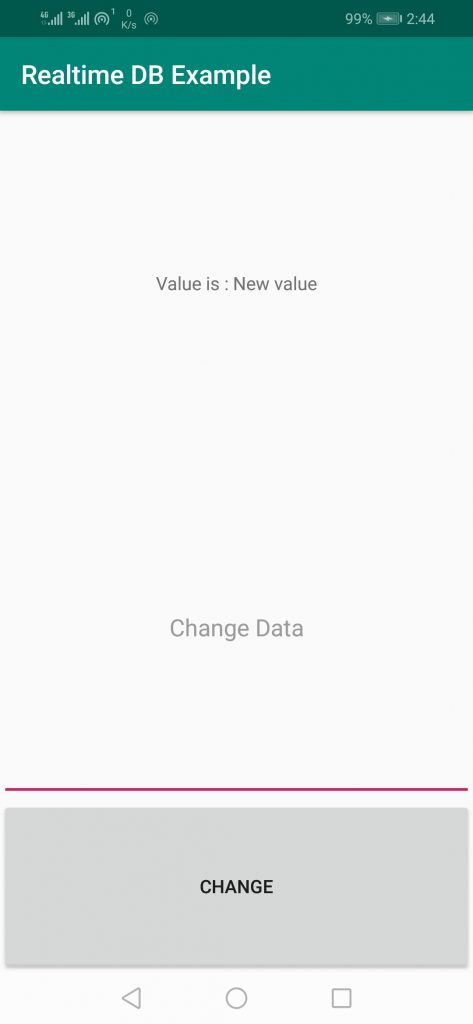
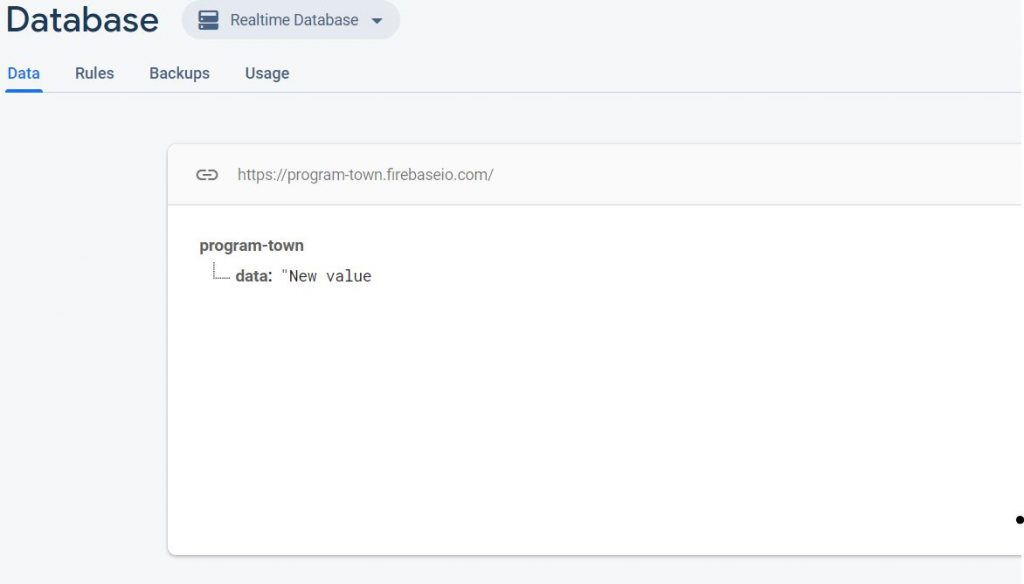
And this newly updated value will be synced/visible to all our connected user of our application.
Conclusion
So in this post we have learned how to integrate/connect Firebase Real Time Database in android application.
Please Subscribe Youtube| Like Facebook | Follow Twitter Mens Winter Single Breasted Big Pockets Mid Long Casual Coats
 Mens Contrast Patchwork Flap Pocket Decoration Short Sleeve T-Shirts
 Orange Pi 800 Development Board 4GB RAM 64GB
 Mens Casual Corduroy Hooded Button Pocket Comfy Shirts
 E500 1.83 inch HD Screen ECG Monitor Heart Rate Blood Pressure
 35L Outdoor Backpack Men Women Waterproof Travel Trekking Backpack
 Home Steam Sauna Box Steam Room Fumigation Machine Steam Sauna Bath Sauna Heater
 GPD WIN Max 2 LPDDR5 32GB RAM 2TB SSD AMD R7 6800U Windows 11 Gaming Notebook 10.1 Inch Laptop Portable Game Computer Handheld Game Console US Plug
 SKYLOONG GK64X GK64XS Keyboard Kit RGB Hot Swappable 60% Programmable bluetooth Wired Case Customized Kit PCB Mounting Plate Case with Replacable Space Key