Custom Multiple Select Dropdown in Alert Dialog Android (Java/Kotlin)
Please Subscribe Youtube| Like Facebook | Follow Twitter
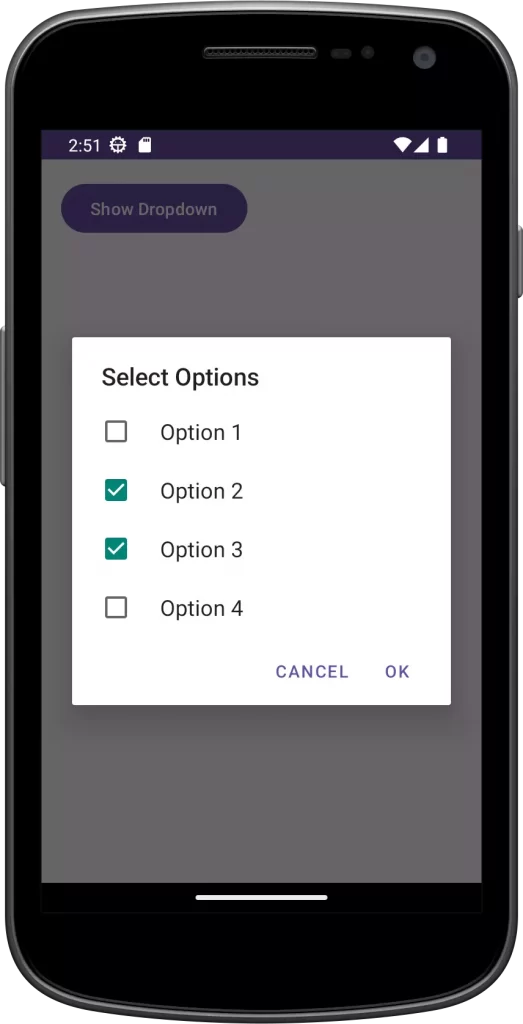
Custom Multiple Select Dropdown in Alert Dialog Android
In this article we will create a custom multiple select dropdown in Alert Dialog for Android (Java/Kotlin) which involves building a custom dialog that displays a list of options and allowing the user to select multiple items from the list.
Implementation In Java
Step 1 : Create a new class for the custom dialog, e.g., CustomMultiSelectDialog.java:
package com.example.myapplication;

import android.app.AlertDialog;
import android.content.Context;
import android.content.DialogInterface;
import android.widget.Toast;
import java.util.ArrayList;

public class CustomMultiSelectDialog {
    private Context context;
    private String title;
    private String[] items;
    private boolean[] checkedItems;
    private DialogInterface.OnMultiChoiceClickListener onMultiChoiceClickListener;

    public CustomMultiSelectDialog(Context context, String title, String[] items) {
        this.context = context;
        this.title = title;
        this.items = items;
        this.checkedItems = new boolean[items.length];
    }

    public void setOnMultiChoiceClickListener(DialogInterface.OnMultiChoiceClickListener listener) {
        this.onMultiChoiceClickListener = listener;
    }

    public void showDialog() {
        AlertDialog.Builder builder = new AlertDialog.Builder(context);
        builder.setTitle(title);
        builder.setMultiChoiceItems(items, checkedItems, onMultiChoiceClickListener);
        builder.setPositiveButton("OK", new DialogInterface.OnClickListener() {
            @Override
            public void onClick(DialogInterface dialog, int which) {
                // Handle OK button click
                dialog.dismiss();

                ArrayList<String> selectedItems = new ArrayList<>();
                for (int i = 0; i < items.length; i++) {
                    if (checkedItems[i]) {
                        selectedItems.add(items[i]);
                    }
                }
                // Call the event function with the selected items
                onSelectedItems(selectedItems);
            }
        });

        builder.setNegativeButton("Cancel", new DialogInterface.OnClickListener() {
            @Override
            public void onClick(DialogInterface dialog, int which) {
                // Handle Cancel button click
                dialog.dismiss();
            }
        });

        AlertDialog dialog = builder.create();
        dialog.show();
    }

    // Event function to handle selected items
    private void onSelectedItems(ArrayList<String> selectedItems) {
        // Implement your logic here to handle the selected items
        // For example, you can display the selected items in a TextView
        // or use them for further processing.
        if(selectedItems.size()>0) {
            Toast.makeText(context.getApplicationContext(), selectedItems.toString() + " option(s) selected", Toast.LENGTH_SHORT).show();
        }else {
            Toast.makeText(context.getApplicationContext(),  "No option selected", Toast.LENGTH_SHORT).show();
        }
    }
}
Step 2 : Implement the custom dropdown in your activity i.e MainActivity.java
package com.example.myapplication;

import android.content.DialogInterface;
import android.os.Bundle;
import android.view.View;
import android.widget.Button;

import androidx.appcompat.app.AppCompatActivity;

public class MainActivity extends AppCompatActivity {

    @Override
    protected void onCreate(Bundle savedInstanceState) {
        super.onCreate(savedInstanceState);
        setContentView(R.layout.activity_main);

        Button showDropdownButton = findViewById(R.id.show_dropdown_button);
        showDropdownButton.setOnClickListener(new View.OnClickListener() {
            @Override
            public void onClick(View v) {
                showCustomMultiSelectDialog();
            }
        });
    }

    private void showCustomMultiSelectDialog() {
        String[] items = {"Option 1", "Option 2", "Option 3", "Option 4"};

        CustomMultiSelectDialog customDialog = new CustomMultiSelectDialog(this, "Select Options", items);
        customDialog.setOnMultiChoiceClickListener(new DialogInterface.OnMultiChoiceClickListener() {
            @Override
            public void onClick(DialogInterface dialog, int which, boolean isChecked) {
                // Handle item click events if needed
            }
        });
        customDialog.showDialog();
    }
}
Step 3 : add the button to your activity’s layout XML i.e activity_main.xml:
<?xml version="1.0" encoding="utf-8"?>
<LinearLayout
    xmlns:android="http://schemas.android.com/apk/res/android"
    android:layout_width="match_parent"
    android:layout_height="match_parent"
    android:orientation="vertical"
    android:padding="16dp">

    <!-- Your other layout elements here -->

    <Button
        android:id="@+id/show_dropdown_button"
        android:layout_width="wrap_content"
        android:layout_height="wrap_content"
        android:text="Show Dropdown" />

</LinearLayout>
Implementation in Kotlin
Step 1: Create a new class for the custom dialog, e.g., CustomMultiSelectDialog.kt
package com.example.myapplication

import android.app.AlertDialog
import android.content.Context
import android.content.DialogInterface
import android.widget.Toast

class CustomMultiSelectDialog(private val context: Context, private val title: String, private val items: Array<String>) {
    private val checkedItems = BooleanArray(items.size)
    private var onMultiChoiceClickListener: DialogInterface.OnMultiChoiceClickListener? = null

    fun setOnMultiChoiceClickListener(listener: DialogInterface.OnMultiChoiceClickListener) {
        onMultiChoiceClickListener = listener
    }

    fun showDialog() {
        val builder = AlertDialog.Builder(context)
        builder.setTitle(title)
        builder.setMultiChoiceItems(items, checkedItems, onMultiChoiceClickListener)

        builder.setPositiveButton("OK") { dialog, _ ->
            // Handle OK button click
            dialog.dismiss()

            val selectedItems = ArrayList<String>()
            for (i in items.indices) {
                if (checkedItems[i]) {
                    selectedItems.add(items[i])
                }
            }
            // Call the event function with the selected items
            onSelectedItems(selectedItems)
        }

        builder.setNegativeButton("Cancel") { dialog, _ ->
            // Handle Cancel button click
            dialog.dismiss()
        }

        val dialog = builder.create()
        dialog.show()
    }

    // Event function to handle selected items
    private fun onSelectedItems(selectedItems: ArrayList<String>) {
        // Implement your logic here to handle the selected items
        // For example, you can display the selected items in a TextView
        // or use them for further processing.
        if (selectedItems.isNotEmpty()) {
            Toast.makeText(
                context.applicationContext,
                "${selectedItems.size} option(s) selected: $selectedItems",
                Toast.LENGTH_SHORT
            ).show()
        } else {
            Toast.makeText(context.applicationContext, "No option selected", Toast.LENGTH_SHORT).show()
        }
    }
}
Step 2: Implement the custom dropdown in your activity, i.e., MainActivity.kt
package com.example.myapplication

import android.content.DialogInterface
import android.os.Bundle
import android.view.View
import android.widget.Button
import androidx.appcompat.app.AppCompatActivity

class MainActivity : AppCompatActivity() {

    override fun onCreate(savedInstanceState: Bundle?) {
        super.onCreate(savedInstanceState)
        setContentView(R.layout.activity_main)

        val showDropdownButton: Button = findViewById(R.id.show_dropdown_button)
        showDropdownButton.setOnClickListener(View.OnClickListener {
            showCustomMultiSelectDialog()
        })
    }

    private fun showCustomMultiSelectDialog() {
        val items = arrayOf("Option 1", "Option 2", "Option 3", "Option 4")

        val customDialog = CustomMultiSelectDialog(this, "Select Options", items)
        customDialog.setOnMultiChoiceClickListener(DialogInterface.OnMultiChoiceClickListener { dialog, which, isChecked ->
            // Handle item click events if needed
        })
        customDialog.showDialog()
    }
}
Step 3: Add the button to your activity’s layout XML, i.e., activity_main.xml:
<?xml version="1.0" encoding="utf-8"?>
<LinearLayout
    xmlns:android="http://schemas.android.com/apk/res/android"
    android:layout_width="match_parent"
    android:layout_height="match_parent"
    android:orientation="vertical"
    android:padding="16dp">

    <!-- Your other layout elements here -->

    <Button
        android:id="@+id/show_dropdown_button"
        android:layout_width="wrap_content"
        android:layout_height="wrap_content"
        android:text="Show Dropdown" />

</LinearLayout>
Conclusion
In this example, when the user clicks the “Show Dropdown” button, the custom multiple select dropdown dialog will be displayed. The user can select multiple options and click the “OK” button to trigger the onSelectedItems event function, which handles the selected items. You can customize the onSelectedItems function to perform actions based on the selected items, such as displaying them in a TextView or performing further processing.
Please Subscribe Youtube| Like Facebook | Follow Twitter