How to create master detail (Sale Invoice) entry form step by step in ASP.NET Core MVC using View Model
Please Subscribe Youtube| Like Facebook | Follow Twitter
YouTube Video: https://youtu.be/llHrsEOGCcY
Introduction
In this article we will create sale invoice master and detail entry form. To achieve this we will do the following steps:
- Create SQL Tables
- Create ASP.NET Core MVC Project
- Install Required Nuget Packages
- Create Model from Existing Database
- Add View Model
- Add Controller
- Add View
- Test the Application
- Summary
 Home Steam Sauna Box Steam Room Fumigation Machine Steam Sauna Bath Sauna Heater
Create SQL Tables
Create a database named TestDB in SQL Server Management Studio and then create two tables named SaleInvoiceMaster and SaleInvoiceDetail. SaleInvoiceMaster will have three columns invID, invDate, and customerName and SaleInvoicDeail table will have four columns invDetailID, invID, itemName and itemQty Here are table queries:
CREATE TABLE SaleInvoiceMaster  (
    invID int NOT NULL IDENTITY(1,1) ,
    invDate date NOT NULL,
    customerName  varchar(100) not null,
    PRIMARY KEY (invID)

);

CREATE TABLE SaleInvoiceDetail  (
    invDetailID int NOT NULL IDENTITY(1,1),
    invID int NOT NULL,
    itemName  varchar(100) not null,
    itemQty int NOT NULL,
    PRIMARY KEY (invDetailID),
    FOREIGN KEY (invID) REFERENCES saleinvoicemaster(invID)
);
Create ASP.NET Core MVC Project
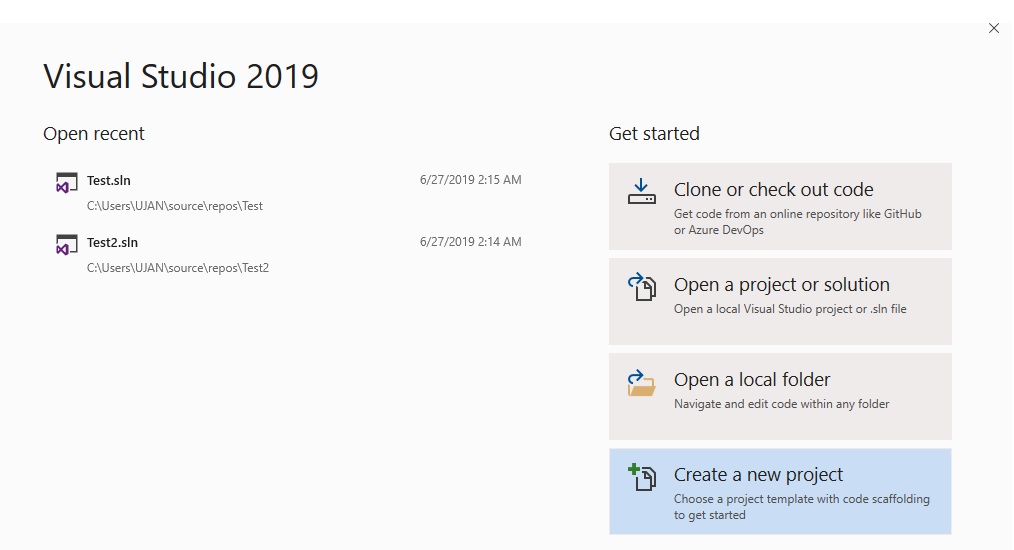
Now we will create an ASP.NET Core Web Application project.
Step1:
Step2:
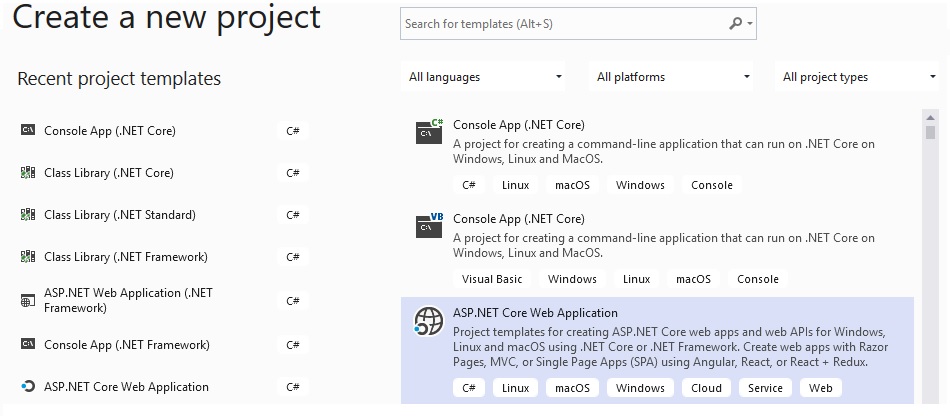
Step3:
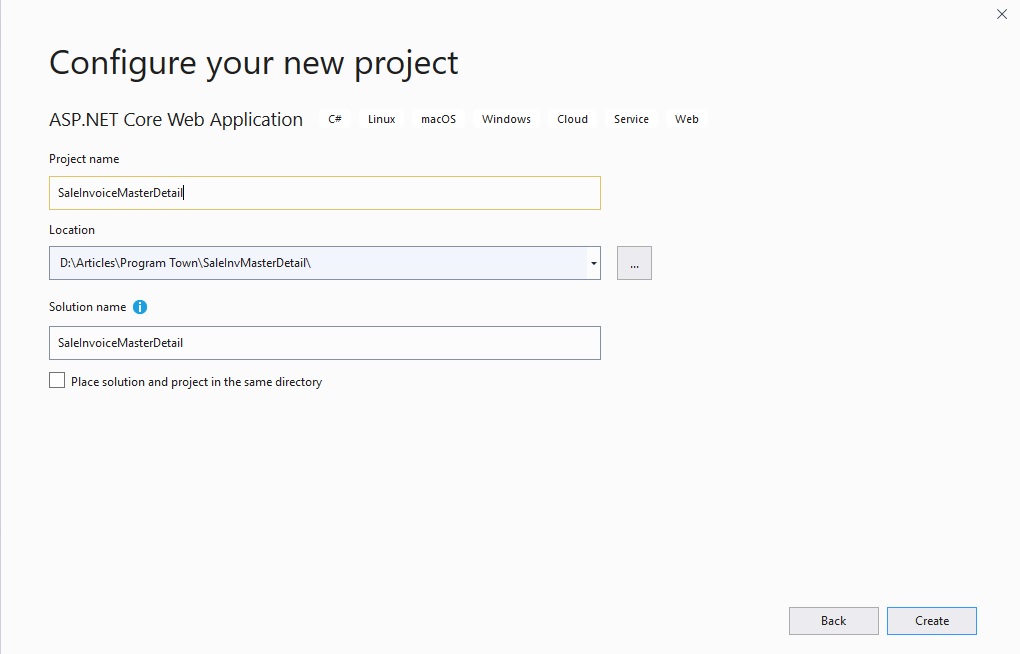
Step4:
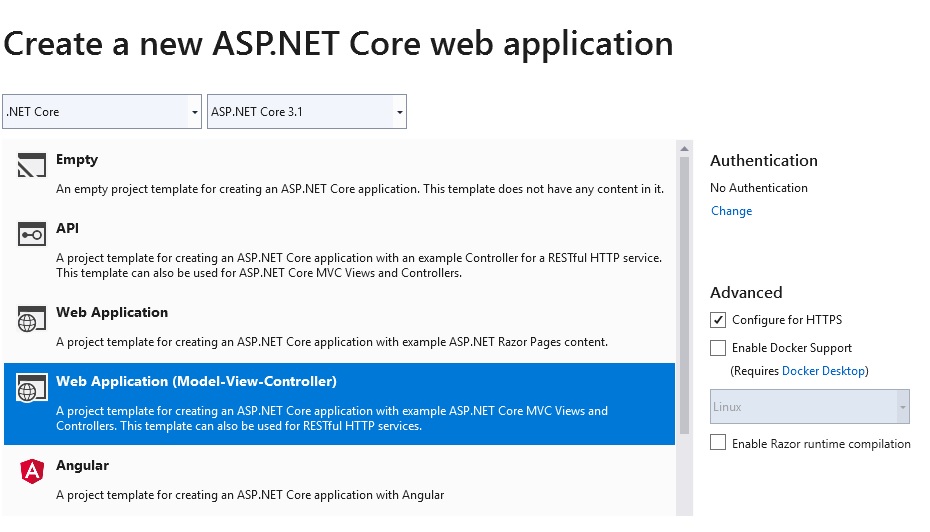
Install Required Nuget Packages
Select Tools menu, select NuGet Package Manager > Package Manager Console.
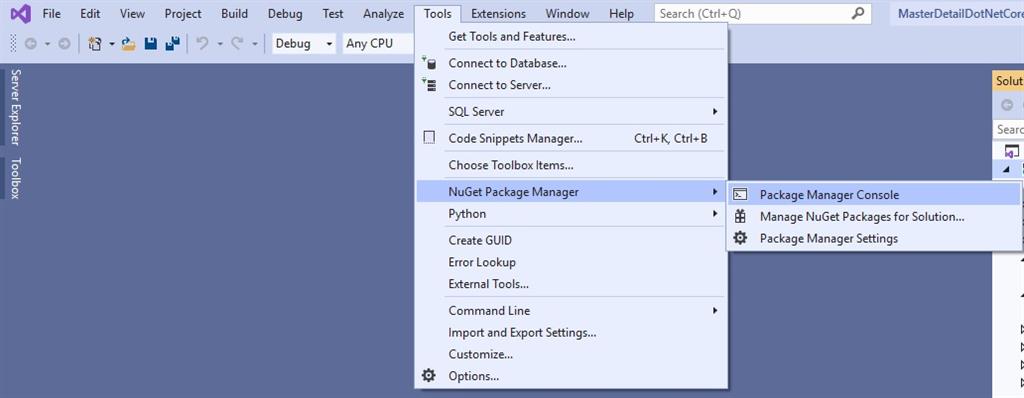
Install SQL Server provider by running the following command in the Package Manager Console.
Install-Package Microsoft.EntityFrameworkCore.SqlServer To add Entity Framework Core Tool, run the following command,
Install-Package Microsoft.EntityFrameworkCore.ToolsCreate Model from Existing Database
We will use the following Scaffold-DbContext command to create a model from our existing database
Scaffold-DbContext "Server=DESKTOP-GV4424J;Database=TestDB;Trusted_Connection=True;" Microsoft.EntityFrameworkCore.SqlServer -OutputDir ModelsAdd View Model
View Model: ASP.NET MVC view cannot have more than one model at a time but View Model can contains properties from more than one domain model. It is also used to insert, update records into more than one entity (table of database) but the main purpose of View Model is to display columns from multiple domain models into a single view.
Right-click on the model folder. Add->Class.
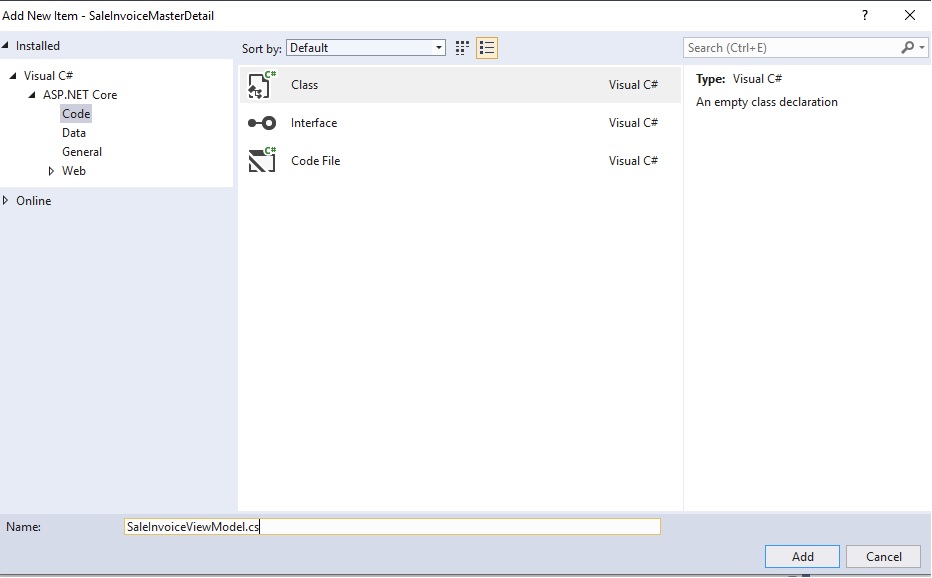
After creating view model, paste the following code in the view model.
public int InvId { get; set; }
[DataType(DataType.Date)]
[DisplayFormat(DataFormatString = "{0:yyyy-MM-dd}", ApplyFormatInEditMode = true)]
public DateTime InvDate { get; set; }
public string CustomerName { get; set; }
public List<SaleInvoiceDetail> saleInvoiceDetails { get; set; }
Add Controller
Right-click on the controller folder. Add->Controller. Select the MVC Controller-Empty.
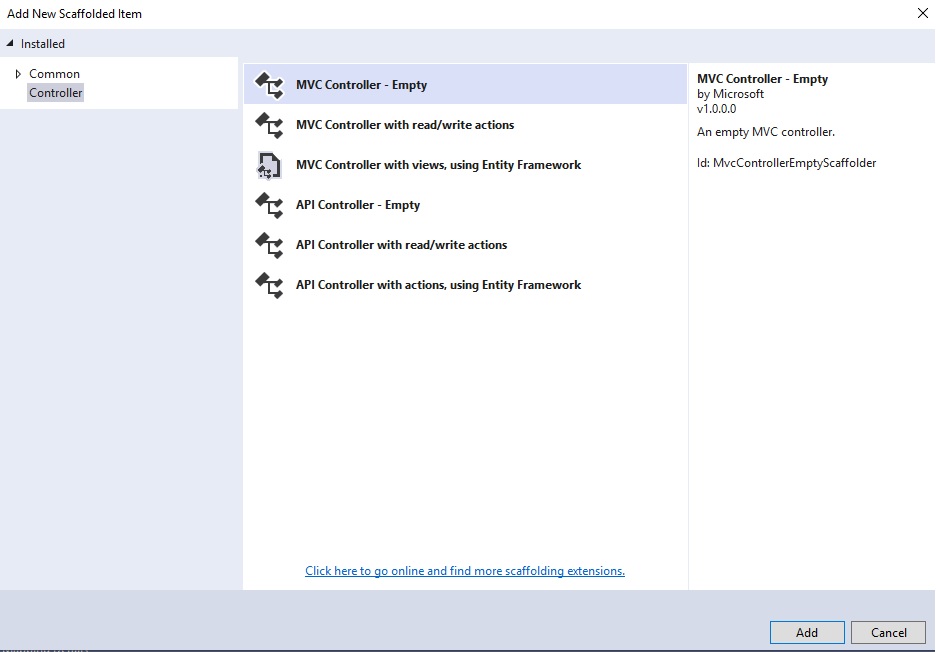

After creating a controller, paste the following code in the controller.
private readonly TestDBContext _context = new TestDBContext();
public IActionResult Create()
{
    SaleInvoiceViewModel viewModel = new SaleInvoiceViewModel();
    viewModel.saleInvoiceDetails = new List<SaleInvoiceDetail>();

    //for a while we are generating rows from server side but good practice //is to genrate it from client side(JQuery/JavaScript)
    SaleInvoiceDetail row1 = new SaleInvoiceDetail();
    SaleInvoiceDetail row2 = new SaleInvoiceDetail();
    SaleInvoiceDetail row3 = new SaleInvoiceDetail();

    viewModel.InvDate = DateTime.Now;
    viewModel.saleInvoiceDetails.Add(row1);
    viewModel.saleInvoiceDetails.Add(row2);
    viewModel.saleInvoiceDetails.Add(row3);
    return View(viewModel);
}

[HttpPost]
[ValidateAntiForgeryToken]
public async Task<IActionResult> Create(SaleInvoiceViewModel saleInvoiceViewModel)
{
    if (ModelState.IsValid)
    {
        var saleInVoiceMaster = new SaleInvoiceMaster()
        {
            InvId = saleInvoiceViewModel.InvId,
            InvDate = saleInvoiceViewModel.InvDate,
            CustomerName = saleInvoiceViewModel.CustomerName
        };


        _context.SaleInvoiceMaster.Add(saleInVoiceMaster);
        await _context.SaveChangesAsync();

        foreach (var i in saleInvoiceViewModel.saleInvoiceDetails)
        {
            var saleInvoiceDetail = new SaleInvoiceDetail()
            {
                InvId = saleInVoiceMaster.InvId,
                ItemName = i.ItemName,
                ItemQty = i.ItemQty
            };


            _context.SaleInvoiceDetail.Add(saleInvoiceDetail);
        }
        await _context.SaveChangesAsync();
        return RedirectToAction(nameof(Create));
    }
    return View(saleInvoiceViewModel);
}
We have two create actions, one Get Create for rendering create view and another post Create for getting values from the view. In Get Create action we will create object of our View Model and add rows for sale invoice detail and then pass it to the view. In Post Create method we just get data from view model and insert into our database.
Add View
Right-click on the Create Action and click on Add view.
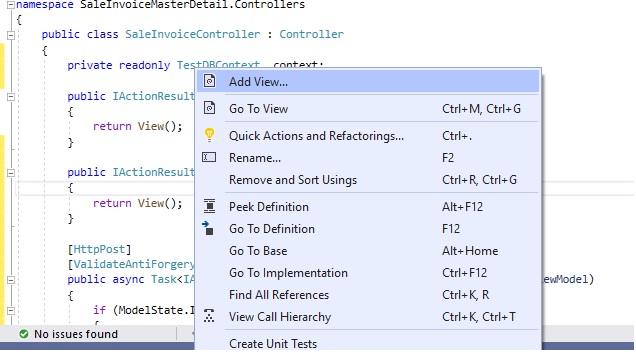
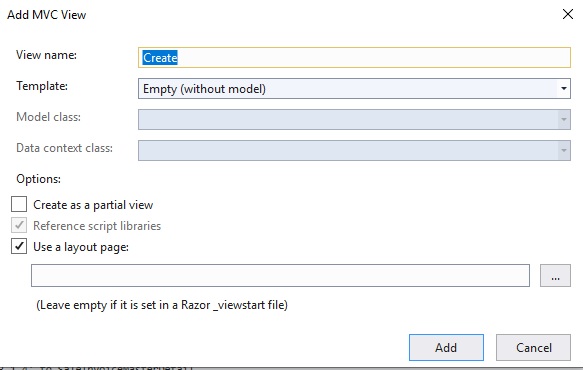
After creating view, paste the following code in the view.
@model SaleInvoiceMasterDetail.Models.SaleInvoiceViewModel

@{
    ViewData["Title"] = "Create";
}

    <h1>Sale Invoice</h1>

<hr />
<div class="row">
    <div class="col-md-4">
        <form asp-action="Create">
            <div asp-validation-summary="ModelOnly" class="text-danger"></div>
            <div class="form-group">
                <label asp-for="InvDate" class="control-label"></label>
                <input asp-for="InvDate" class="form-control" />
                <span asp-validation-for="InvDate" class="text-danger"></span>
            </div>
            <div class="form-group">
                <label asp-for="CustomerName" class="control-label"></label>
                <input asp-for="CustomerName" class="form-control" />
                <span asp-validation-for="CustomerName" class="text-danger"></span>
            </div>


            <table class="table table-striped table-bordered bulk_action">
                <th>Item</th>
                <th>Qty</th>


                @for (int i = 0; i < Model.saleInvoiceDetails.Count; i++)
                {
                    <tr>
                        <td>
                            <input asp-for="@Model.saleInvoiceDetails[i].ItemName" class="form-control" />

                        </td>
                        <td>

                            <input asp-for="@Model.saleInvoiceDetails[i].ItemQty" class="form-control" />
                        </td>


                    </tr>
                }
            </table>


            <div class="form-group">
                <input type="submit" value="Create" class="btn btn-primary" />
            </div>
        </form>
    </div>
</div>


@section Scripts {
    @{await Html.RenderPartialAsync("_ValidationScriptsPartial");}
}
Test the Application
Run the application, and go to SaleInvoice/Create.
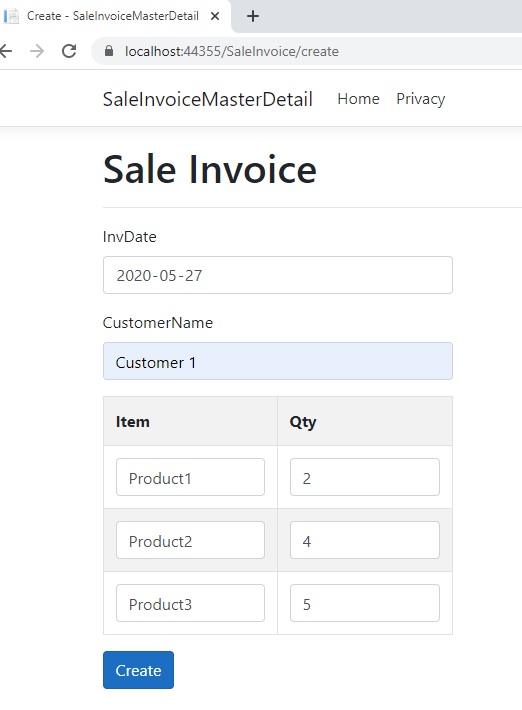
After save check into the database.
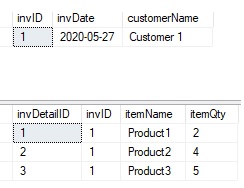
Summary
In this article we have learned how to create master detail entry form in ASP.NET Core MVC. Hope you all liked it.
 Mens Winter Single Breasted Big Pockets Mid Long Casual Coats
 Mens Contrast Patchwork Flap Pocket Decoration Short Sleeve T-Shirts
 Orange Pi 800 Development Board 4GB RAM 64GB
 Mens Casual Corduroy Hooded Button Pocket Comfy Shirts
 E500 1.83 inch HD Screen ECG Monitor Heart Rate Blood Pressure
 35L Outdoor Backpack Men Women Waterproof Travel Trekking Backpack
 GPD WIN Max 2 LPDDR5 32GB RAM 2TB SSD AMD R7 6800U Windows 11 Gaming Notebook 10.1 Inch Laptop Portable Game Computer Handheld Game Console US Plug
 SKYLOONG GK64X GK64XS Keyboard Kit RGB Hot Swappable 60% Programmable bluetooth Wired Case Customized Kit PCB Mounting Plate Case with Replacable Space Key
How to keep rows count based on user request,so he can save one row or 10 rows using Add row button.
Provide HTML table ID attribute then select HTML table using ID attribute with JQUERY/JavaScript after that get no of rows from the property of selected element.