Android (Java/Kotlin) Sample App To Chat with GPT-3 or OpenAI
Please Subscribe Youtube| Like Facebook | Follow Twitter
Android (Java/Kotlin) Sample App To Chat with GPT-3 or OpenAI
In this article, we embark on an exciting journey to build an Android (Java/Kotlin) Sample App To Chat with GPT-3 or OpenAI that enables users to have interactive and dynamic conversations with cutting-edge language models. We will explore the steps to integrate GPT-3 or OpenAI’s APIs into the app and design a user-friendly interface that showcases the AI-generated responses in real-time.
Step 1: Go to website and Sign up / Sign in
Go to the GPT-3 or OpenAI website and sign up for an account or Sign in.
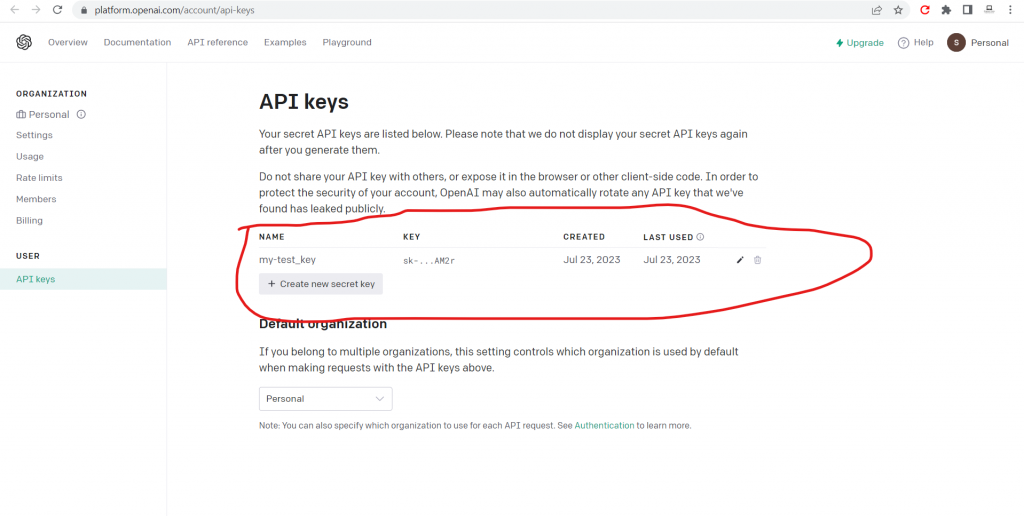
Step 2: Obtain the API Key or Token
- Go to View API keys and Select create new secret key button
- Please save this secret key somewhere safe and accessible. For security reasons, you won’t be able to view it again through your OpenAI account. If you lose this secret key, you’ll need to generate a new one.
- This key/token will serve as your authentication mechanism to access their API services.
Step 3: Create a New Android Project
Open Android Studio and create a new Android project with an empty activity.
Step 4: Add Dependencies Libraries in build.gradle file
Open your build.gradle file (app level) add below dependencies
// Retrofit
implementation 'com.squareup.retrofit2:retrofit:2.9.0'
implementation 'com.squareup.retrofit2:converter-gson:2.9.0'
//recycle view
implementation 'androidx.recyclerview:recyclerview:1.3.0'
Step 5: Add Internet Permission in Manifest File
<uses-permission android:name="android.permission.INTERNET" />Step 6: Design UI
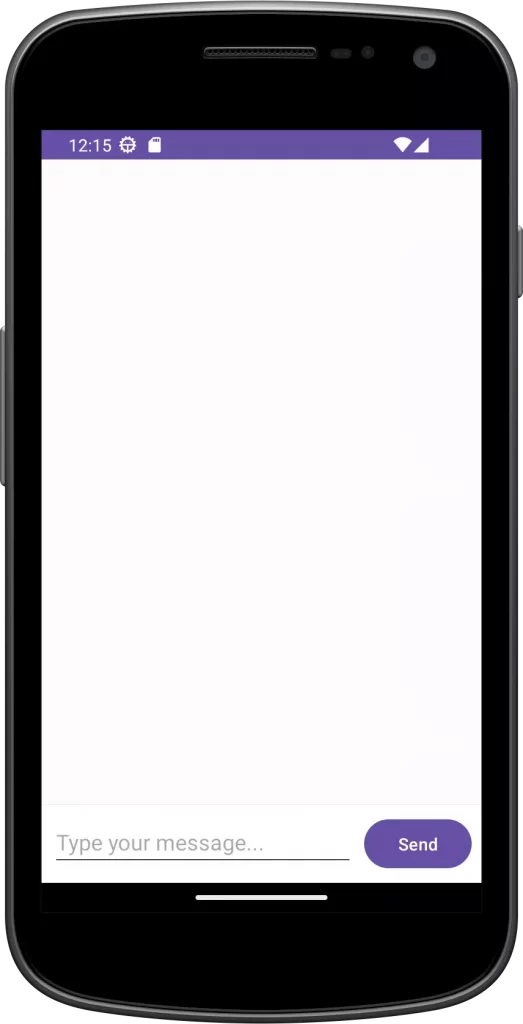
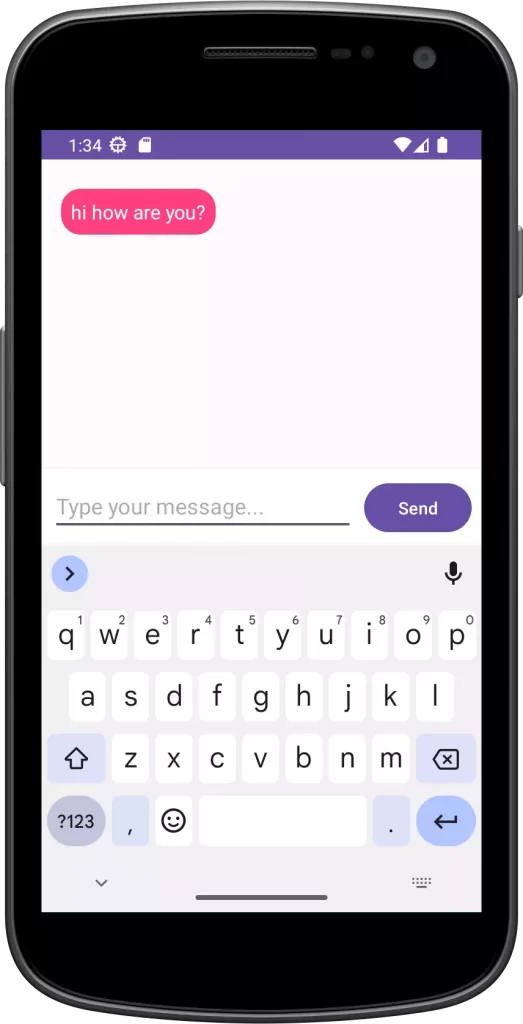
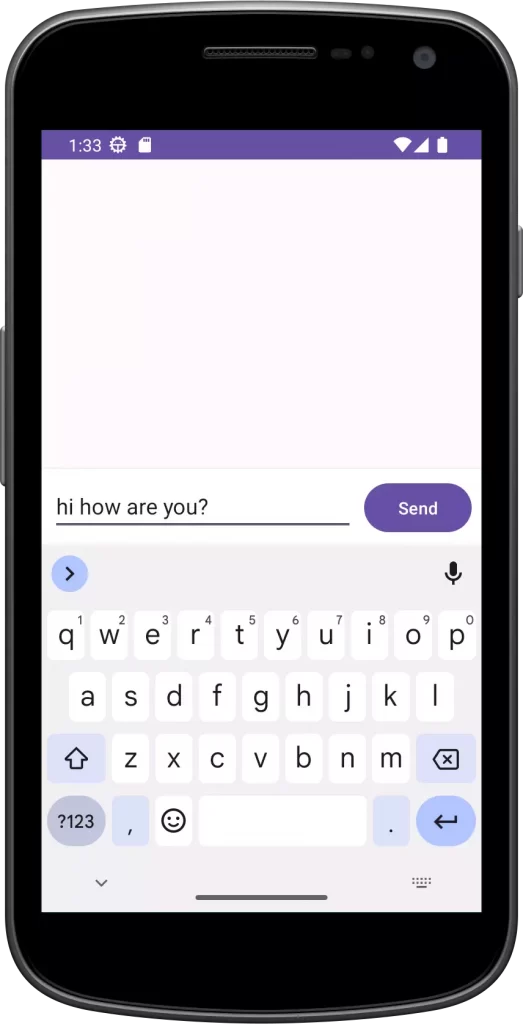
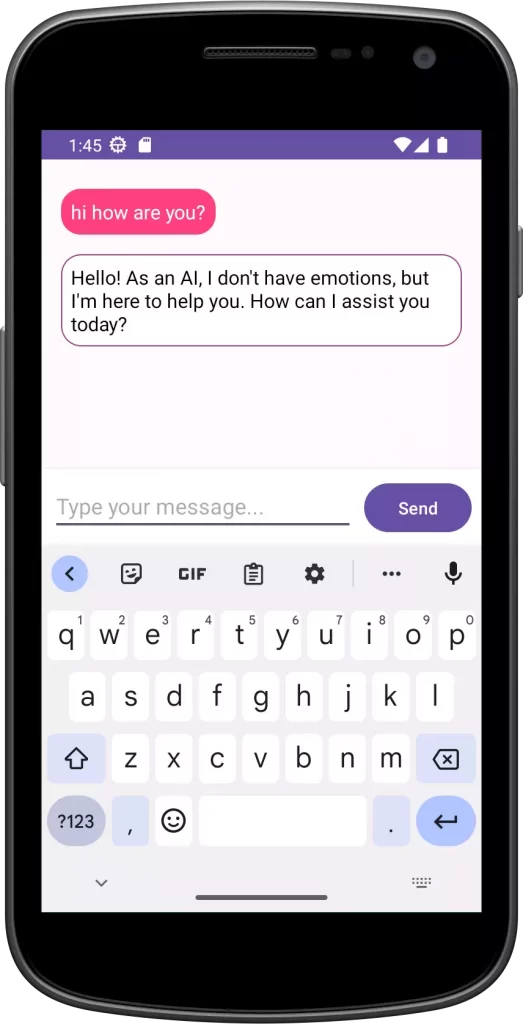
In this step we will design UI to communicate with chat gpt. UI will have chat box (Chat bubble container/RecyclerView) , Edit text for typing message and button to send message.
activity_main.xml in res/layout
<!-- activity_main.xml -->
<RelativeLayout
    xmlns:android="http://schemas.android.com/apk/res/android"
    android:layout_width="match_parent"
    android:layout_height="match_parent">

    <!-- Chat bubble container -->
    <androidx.recyclerview.widget.RecyclerView
        android:id="@+id/recycler_view_chat"
        android:layout_width="match_parent"
        android:layout_height="match_parent"
        android:layout_above="@+id/layout_input"
        android:padding="16dp"
        android:clipToPadding="false"
        android:scrollbars="vertical"
        android:overScrollMode="always"/>

    <!-- Input layout -->
    <RelativeLayout
        android:id="@+id/layout_input"
        android:layout_width="match_parent"
        android:layout_height="wrap_content"
        android:layout_alignParentBottom="true"
        android:background="@android:color/white"
        android:elevation="4dp"
        android:padding="8dp">

        <!-- Message input EditText -->
        <EditText
            android:id="@+id/edit_text_input"
            android:layout_width="match_parent"
            android:layout_height="wrap_content"
            android:layout_toLeftOf="@+id/button_send"
            android:layout_toStartOf="@+id/button_send"
            android:hint="Type your message..."
            android:maxLines="4"
            android:inputType="textMultiLine"
            android:imeOptions="actionSend"
            android:layout_marginEnd="8dp"
            android:layout_marginRight="8dp"/>

        <!-- Send button -->
        <Button
            android:id="@+id/button_send"
            android:layout_width="wrap_content"
            android:layout_height="wrap_content"
            android:layout_alignParentEnd="true"
            android:layout_alignParentRight="true"
            android:layout_centerVertical="true"
            android:text="Send"/>

    </RelativeLayout>
</RelativeLayout>
item_chat_bubble_ai.xml in res/layout
<!-- item_chat_bubble_ai.xml -->
<RelativeLayout
    xmlns:android="http://schemas.android.com/apk/res/android"
    android:layout_width="wrap_content"
    android:layout_height="wrap_content"
    android:padding="8dp"
    android:background="@drawable/chat_bubble_background_ai">

    <TextView
        android:id="@+id/text_view_message"
        android:layout_width="wrap_content"
        android:layout_height="wrap_content"
        android:textColor="@android:color/black"
        android:textSize="16sp"/>

</RelativeLayout>
item_chat_bubble_user.xml in res/layout
<!-- item_chat_bubble_user.xml -->
<RelativeLayout
    xmlns:android="http://schemas.android.com/apk/res/android"
    android:layout_width="wrap_content"
    android:layout_height="wrap_content"
    android:padding="8dp"
    android:background="@drawable/chat_bubble_background_user">

    <TextView
        android:id="@+id/text_view_message"
        android:layout_width="wrap_content"
        android:layout_height="wrap_content"
        android:textColor="@android:color/white"
        android:textSize="16sp"/>

</RelativeLayout>
chat_bubble_background_ai.xml in res/drawable
<shape xmlns:android="http://schemas.android.com/apk/res/android"
    android:shape="rectangle">
    <solid android:color="@android:color/white"/> <!-- Customize the color as per your design -->
    <corners android:radius="16dp"/> <!-- Customize the corner radius as per your design -->
    <stroke
        android:width="1dp"
    android:color="@color/secondary"/> <!-- Customize the border color as per your design -->
</shape>
chat_bubble_background_user.xml in res/drawable
<shape xmlns:android="http://schemas.android.com/apk/res/android"
    android:shape="rectangle">
    <solid android:color="@color/primary"/> <!-- Customize the color as per your design -->
    <corners android:radius="16dp"/> <!-- Customize the corner radius as per your design -->
</shape>
dimens.xml in res/values
<?xml version="1.0" encoding="utf-8"?>
<resources>
    <dimen name="spacing_between_bubbles">8dp</dimen>
</resources>
colors.xml in res/values
<?xml version="1.0" encoding="utf-8"?>
<resources>
    <color name="black">#FF000000</color>
    <color name="white">#FFFFFFFF</color>
    <color name="primary">#FF4081</color>
    <color name="secondary">#a14081</color>
</resources>
Step 7 : Set Up API Integration
Set Up API Integration to communicate chat gpt
For Java
Create OpenAIAPIClient, OpenAIRequestModel, OpenAIResponseModel java calsses
OpenAIAPIClient.java
package com.example.myapplication;

import retrofit2.Call;
import retrofit2.Retrofit;
import retrofit2.converter.gson.GsonConverterFactory;
import retrofit2.http.Body;
import retrofit2.http.Headers;
import retrofit2.http.POST;

public class OpenAIAPIClient {
    private static final String BASE_URL = "https://api.openai.com/v1/";

    public interface OpenAIAPIService {
        @Headers("Authorization: Bearer YOUR_SECRET_KEY")
        @POST("chat/completions")
        Call<OpenAIResponseModel> getCompletion(@Body OpenAIRequestModel requestModel);
    }

    public static OpenAIAPIService create() {
        Retrofit retrofit = new Retrofit.Builder()
                .baseUrl(BASE_URL)
                .addConverterFactory(GsonConverterFactory.create())
                .build();

        return retrofit.create(OpenAIAPIService.class);
    }
}
Replace “YOUR_SECRET_KEY” with your actual OpenAI API secret key.
OpenAIRequestModel.java
package com.example.myapplication;

import com.google.gson.annotations.SerializedName;
import java.util.List;

public class OpenAIRequestModel {
    @SerializedName("model")
    private String model;
    @SerializedName("messages")
    private List<Message> messages;
    @SerializedName("temperature")
    private float temperature;

    public OpenAIRequestModel(String model, List<Message> messages, float temperature) {
        this.model = model;
        this.messages = messages;
        this.temperature = temperature;
    }
}

class Message {
    @SerializedName("role")
    private String role;
    @SerializedName("content")
    private String content;

    public Message(String role, String content) {
        this.role = role;
        this.content = content;
    }
}
OpenAIResponseModel.java
package com.example.myapplication;

import com.google.gson.annotations.SerializedName;

public class OpenAIResponseModel {
    @SerializedName("id")
    private String id;
    @SerializedName("object")
    private String objectType;
    @SerializedName("created")
    private long createdTimestamp;
    @SerializedName("model")
    private String modelVersion;
    @SerializedName("choices")
    private OpenAIChoice[] choices;
    @SerializedName("usage")
    private Usage usageInfo;

    public String getId() {
        return id;
    }

    public String getObjectType() {
        return objectType;
    }

    public long getCreatedTimestamp() {
        return createdTimestamp;
    }

    public String getModelVersion() {
        return modelVersion;
    }

    public OpenAIChoice[] getChoices() {
        return choices;
    }

    public Usage getUsageInfo() {
        return usageInfo;
    }
}

class OpenAIChoice {
    @SerializedName("message")
    private ResponseMessage message;
    @SerializedName("finish_reason")
    private String finishReason;

    public ResponseMessage getMessage() {
        return message;
    }

    public String getFinishReason() {
        return finishReason;
    }
}

class ResponseMessage {
    @SerializedName("role")
    private String role;
    @SerializedName("content")
    private String content;

    public String getRole() {
        return role;
    }

    public String getContent() {
        return content;
    }
}

class Usage {
    @SerializedName("prompt_tokens")
    private int promptTokens;
    @SerializedName("completion_tokens")
    private int completionTokens;
    @SerializedName("total_tokens")
    private int totalTokens;

    public int getPromptTokens() {
        return promptTokens;
    }

    public int getCompletionTokens() {
        return completionTokens;
    }

    public int getTotalTokens() {
        return totalTokens;
    }
}
For Kotlin
Create OpenAIAPIClient, OpenAIRequestModel, OpenAIResponseModel kotlin calsses/files
OpenAIAPIClient.kt
package com.example.myapplication

import retrofit2.Call
import retrofit2.Retrofit
import retrofit2.converter.gson.GsonConverterFactory
import retrofit2.http.Body
import retrofit2.http.Headers
import retrofit2.http.POST

object OpenAIAPIClient {
    private const val BASE_URL = "https://api.openai.com/v1/"

    interface OpenAIAPIService {
        @Headers("Authorization: Bearer YOUR_SECRET_KEY")
        @POST("chat/completions")
        fun getCompletion(@Body requestModel: OpenAIRequestModel): Call<OpenAIResponseModel>
    }

    fun create(): OpenAIAPIService {
        val retrofit = Retrofit.Builder()
            .baseUrl(BASE_URL)
            .addConverterFactory(GsonConverterFactory.create())
            .build()
        return retrofit.create(OpenAIAPIService::class.java)
    }
}
Replace “YOUR_SECRET_KEY” with your actual OpenAI API secret key.
OpenAIRequestModel.kt
package com.example.myapplication

import com.google.gson.annotations.SerializedName

data class OpenAIRequestModel(
    @SerializedName("model") val model: String,
    @SerializedName("messages") val messages: List<Message>,
    @SerializedName("temperature") val temperature: Float
)

data class Message(
    @SerializedName("role") val role: String,
    @SerializedName("content") val content: String
)
OpenAIResponseModel.kt
package com.example.myapplication

import com.google.gson.annotations.SerializedName

data class OpenAIResponseModel(
    @SerializedName("id") val id: String,
    @SerializedName("object") val objectType: String,
    @SerializedName("created") val createdTimestamp: Long,
    @SerializedName("model") val modelVersion: String,
    @SerializedName("choices") val choices: Array<OpenAIChoice>,
    @SerializedName("usage") val usageInfo: Usage
)

data class OpenAIChoice(
    @SerializedName("message") val responseMessage: ResponseMessage,
    @SerializedName("finish_reason") val finishReason: String
)

data class ResponseMessage(
    @SerializedName("role") val role: String,
    @SerializedName("content") val content: String
)

data class Usage(
    @SerializedName("prompt_tokens") val promptTokens: Int,
    @SerializedName("completion_tokens") val completionTokens: Int,
    @SerializedName("total_tokens") val totalTokens: Int
)
Step 8 : Implement Chat Model
For Java
Add ChatAdapter/ChatItemDecoration/ChatMessage java classes
ChatAdapter.java
package com.example.myapplication;

import android.view.LayoutInflater;
import android.view.View;
import android.view.ViewGroup;
import android.widget.TextView;

import androidx.annotation.NonNull;
import androidx.recyclerview.widget.RecyclerView;

import java.util.List;

public class ChatAdapter extends RecyclerView.Adapter<RecyclerView.ViewHolder> {
    private List<ChatMessage> chatMessages;

    public ChatAdapter(List<ChatMessage> chatMessages) {
        this.chatMessages = chatMessages;
    }

    @Override
    public int getItemViewType(int position) {
        return chatMessages.get(position).isUser() ? 0 : 1;
    }

    @NonNull
    @Override
    public RecyclerView.ViewHolder onCreateViewHolder(@NonNull ViewGroup parent, int viewType) {
        LayoutInflater inflater = LayoutInflater.from(parent.getContext());
        if (viewType == 0) {
            View userMessageView = inflater.inflate(R.layout.item_chat_bubble_user, parent, false);
            return new UserMessageViewHolder(userMessageView);
        } else {
            View aiMessageView = inflater.inflate(R.layout.item_chat_bubble_ai, parent, false);
            return new AiMessageViewHolder(aiMessageView);
        }
    }

    // ViewHolder class for user messages
    private static class UserMessageViewHolder extends RecyclerView.ViewHolder {
        private TextView messageTextView;

        UserMessageViewHolder(View itemView) {
            super(itemView);
            messageTextView = itemView.findViewById(R.id.text_view_message);
        }

        void bind(ChatMessage message) {
            messageTextView.setText(message.getMessage());
        }
    }

    // ViewHolder class for AI-generated messages
    private static class AiMessageViewHolder extends RecyclerView.ViewHolder {
        private TextView messageTextView;

        AiMessageViewHolder(View itemView) {
            super(itemView);
            messageTextView = itemView.findViewById(R.id.text_view_message);
        }

        void bind(ChatMessage message) {
            messageTextView.setText(message.getMessage());
        }
    }

    @Override
    public void onBindViewHolder(@NonNull RecyclerView.ViewHolder holder, int position) {
        ChatMessage chatMessage = chatMessages.get(position);
        if (holder.getItemViewType() == 0) {
            ((UserMessageViewHolder) holder).bind(chatMessage);
        } else {
            ((AiMessageViewHolder) holder).bind(chatMessage);
        }
    }

    @Override
    public int getItemCount() {
        return chatMessages.size();
    }

    // Add the addMessage method to add new ChatMessage objects to the adapter
    public void addMessage(ChatMessage message) {
        chatMessages.add(message);
        notifyItemInserted(chatMessages.size() - 1);
    }
}
ChatMessage.java
package com.example.myapplication;

public class ChatMessage {
    private String message;
    private boolean isUser; // To differentiate between user and AI-generated messages

    public ChatMessage(String message, boolean isUser) {
        this.message = message;
        this.isUser = isUser;
    }

    public String getMessage() {
        return message;
    }

    public boolean isUser() {
        return isUser;
    }
}
ChatItemDecoration.java
package com.example.myapplication;

import android.graphics.Rect;
import android.view.View;

import androidx.recyclerview.widget.RecyclerView;

public class ChatItemDecoration extends RecyclerView.ItemDecoration {
    private final int spacing;

    public ChatItemDecoration(int spacing) {
        this.spacing = spacing;
    }

    @Override
    public void getItemOffsets(Rect outRect, View view, RecyclerView parent, RecyclerView.State state) {
        super.getItemOffsets(outRect, view, parent, state);

        outRect.top = spacing;
        outRect.bottom = spacing;
    }
}
For Kotlin
Add ChatAdapter/ChatItemDecoration/ChatMessage kotlin files/classes
ChatAdapter.kt
package com.example.myapplication

import android.view.LayoutInflater
import android.view.View
import android.view.ViewGroup
import android.widget.TextView
import androidx.recyclerview.widget.RecyclerView

class ChatAdapter(private val chatMessages: MutableList<ChatMessage>) : RecyclerView.Adapter<RecyclerView.ViewHolder>() {

    override fun getItemViewType(position: Int): Int {
        return if (chatMessages[position].isUser) 0 else 1
    }

    override fun onCreateViewHolder(parent: ViewGroup, viewType: Int): RecyclerView.ViewHolder {
        val inflater = LayoutInflater.from(parent.context)
        return if (viewType == 0) {
            val userMessageView = inflater.inflate(R.layout.item_chat_bubble_user, parent, false)
            UserMessageViewHolder(userMessageView)
        } else {
            val aiMessageView = inflater.inflate(R.layout.item_chat_bubble_ai, parent, false)
            AiMessageViewHolder(aiMessageView)
        }
    }

    override fun onBindViewHolder(holder: RecyclerView.ViewHolder, position: Int) {
        val chatMessage = chatMessages[position]
        if (holder.itemViewType == 0) {
            (holder as UserMessageViewHolder).bind(chatMessage)
        } else {
            (holder as AiMessageViewHolder).bind(chatMessage)
        }
    }

    override fun getItemCount(): Int {
        return chatMessages.size
    }

    // ViewHolder class for user messages
    private inner class UserMessageViewHolder(itemView: View) : RecyclerView.ViewHolder(itemView) {
        private val messageTextView: TextView = itemView.findViewById(R.id.text_view_message)

        fun bind(message: ChatMessage) {
            messageTextView.text = message.message
        }
    }

    // ViewHolder class for AI-generated messages
    private inner class AiMessageViewHolder(itemView: View) : RecyclerView.ViewHolder(itemView) {
        private val messageTextView: TextView = itemView.findViewById(R.id.text_view_message)

        fun bind(message: ChatMessage) {
            messageTextView.text = message.message
        }
    }

    // Add the addMessage method to add new ChatMessage objects to the adapter
    fun addMessage(message: ChatMessage) {
        chatMessages.add(message)
        notifyItemInserted(chatMessages.size - 1)
    }
}
ChatMessage.kt
package com.example.myapplication

data class ChatMessage(val message: String, val isUser: Boolean)
ChatItemDecoration.kt
package com.example.myapplication

import android.graphics.Rect
import android.view.View
import androidx.recyclerview.widget.RecyclerView

class ChatItemDecoration(private val spacing: Int) : RecyclerView.ItemDecoration() {
    override fun getItemOffsets(outRect: Rect, view: View, parent: RecyclerView, state: RecyclerView.State) {
        super.getItemOffsets(outRect, view, parent, state)
        outRect.top = spacing
        outRect.bottom = spacing
    }
}
Step 9: Implement Chat Logic
- In the MainActivity, handle user input from the chat input box and send it as an API request to the language model.
- Receive the API response and extract the AI-generated message.
- Display the AI-generated message as a chat bubble in the chat bubble container.
For Java
MainActivity.java
package com.example.myapplication;

import android.os.Bundle;
import android.widget.Button;
import android.widget.EditText;

import androidx.appcompat.app.AppCompatActivity;
import androidx.recyclerview.widget.LinearLayoutManager;
import androidx.recyclerview.widget.RecyclerView;

import java.util.ArrayList;
import java.util.List;

import retrofit2.Call;
import retrofit2.Callback;
import retrofit2.Response;

public class MainActivity extends AppCompatActivity {

    private RecyclerView recyclerView;
    private ChatAdapter chatAdapter;

    @Override
    protected void onCreate(Bundle savedInstanceState) {
        super.onCreate(savedInstanceState);
        setContentView(R.layout.activity_main);

        recyclerView = findViewById(R.id.recycler_view_chat);
        chatAdapter = new ChatAdapter(new ArrayList<>());
        LinearLayoutManager layoutManager = new LinearLayoutManager(this);
        recyclerView.setLayoutManager(layoutManager);
        recyclerView.setAdapter(chatAdapter);
        // Set the custom item decoration to add spacing between chat bubbles
        int spacingBetweenBubbles = getResources().getDimensionPixelSize(R.dimen.spacing_between_bubbles);
        recyclerView.addItemDecoration(new ChatItemDecoration(spacingBetweenBubbles));

        Button sendButton = findViewById(R.id.button_send);
        EditText inputEditText = findViewById(R.id.edit_text_input);

        sendButton.setOnClickListener(v -> {
            String userMessage = inputEditText.getText().toString().trim();
            if (!userMessage.isEmpty()) {
                addMessageToChat(new ChatMessage(userMessage, true));
                // ask chat gpt
                askChatGpt(userMessage);
                inputEditText.setText("");
            }
        });
    }

    // Method to add a new message to the chat list
    private void addMessageToChat(ChatMessage chatMessage) {
        chatAdapter.addMessage(chatMessage);
        recyclerView.scrollToPosition(chatAdapter.getItemCount() - 1);
    }

    // interact with chat gpt api
    private void askChatGpt(String userPrompt) {
        // Create the Retrofit client
        OpenAIAPIClient.OpenAIAPIService apiService = OpenAIAPIClient.create();

        // Create the request model
        Message message = new Message("user", userPrompt);
        List<Message> messageList = new ArrayList<>();
        messageList.add(message);
        OpenAIRequestModel requestModel = new OpenAIRequestModel("gpt-3.5-turbo", messageList, 0.7f);


        // Make the API request
        Call<OpenAIResponseModel> call = apiService.getCompletion(requestModel);
        call.enqueue(new Callback<OpenAIResponseModel>() {
            @Override
            public void onResponse(Call<OpenAIResponseModel> call, Response<OpenAIResponseModel> response) {
                if (response.isSuccessful() && response.body() != null) {
                    OpenAIResponseModel responseBody = response.body();
                    String generatedText = responseBody.getChoices()[0].getMessage().getContent();
                    addMessageToChat(new ChatMessage(generatedText, false));
                } else {
                    // Handle API error
                    addMessageToChat(new ChatMessage("API error", false));
                }
            }

            @Override
            public void onFailure(Call<OpenAIResponseModel> call, Throwable t) {
                // Handle network or request failure
                addMessageToChat(new ChatMessage("API onFailure: "+t.getMessage(), false));
            }
        });
    }
}
For Kotlin
MainActivity.kt
package com.example.myapplication

import android.os.Bundle
import android.widget.Button
import android.widget.EditText
import androidx.appcompat.app.AppCompatActivity
import androidx.recyclerview.widget.LinearLayoutManager
import androidx.recyclerview.widget.RecyclerView
import retrofit2.Call
import retrofit2.Callback
import retrofit2.Response
import java.util.*

class MainActivity : AppCompatActivity() {
    private lateinit var recyclerView: RecyclerView
    private lateinit var chatAdapter: ChatAdapter

    override fun onCreate(savedInstanceState: Bundle?) {
        super.onCreate(savedInstanceState)
        setContentView(R.layout.activity_main)

        recyclerView = findViewById(R.id.recycler_view_chat)
        chatAdapter = ChatAdapter(ArrayList())
        val layoutManager = LinearLayoutManager(this)
        recyclerView.layoutManager = layoutManager
        recyclerView.adapter = chatAdapter

        // Set the custom item decoration to add spacing between chat bubbles
        val spacingBetweenBubbles = resources.getDimensionPixelSize(R.dimen.spacing_between_bubbles)
        recyclerView.addItemDecoration(ChatItemDecoration(spacingBetweenBubbles))

        val sendButton = findViewById<Button>(R.id.button_send)
        val inputEditText = findViewById<EditText>(R.id.edit_text_input)

        sendButton.setOnClickListener {
            val userMessage = inputEditText.text.toString().trim()
            if (userMessage.isNotEmpty()) {
                addMessageToChat(ChatMessage(userMessage, true))
                // Ask chat gpt
                askChatGpt(userMessage)
                inputEditText.setText("")
            }
        }
    }

    // Method to add a new message to the chat list
    private fun addMessageToChat(chatMessage: ChatMessage) {
        chatAdapter.addMessage(chatMessage)
        recyclerView.scrollToPosition(chatAdapter.itemCount - 1)
    }

    // Interact with chat gpt api
    private fun askChatGpt(userPrompt: String) {
        // Create the Retrofit client
        val apiService = OpenAIAPIClient.create()

        // Create the request model
        val messageList = listOf(Message("user", userPrompt))
        val requestModel = OpenAIRequestModel("gpt-3.5-turbo",messageList, 0.7f)

        // Make the API request
        val call: Call<OpenAIResponseModel> = apiService.getCompletion(requestModel)
        call.enqueue(object : Callback<OpenAIResponseModel> {
            override fun onResponse(call: Call<OpenAIResponseModel>, response: Response<OpenAIResponseModel>) {
                if (response.isSuccessful && response.body() != null) {
                    val responseBody = response.body()
                    val generatedText = responseBody?.choices?.get(0)?.responseMessage?.content
                    generatedText?.let { addMessageToChat(ChatMessage(it, false)) }
                } else {
                    // Handle API error
                    addMessageToChat(ChatMessage("API error", false))
                }
            }

            override fun onFailure(call: Call<OpenAIResponseModel>, t: Throwable) {
                // Handle network or request failure
                addMessageToChat(ChatMessage("API onFailure: ${t.message}", false))
            }
        })
    }
}
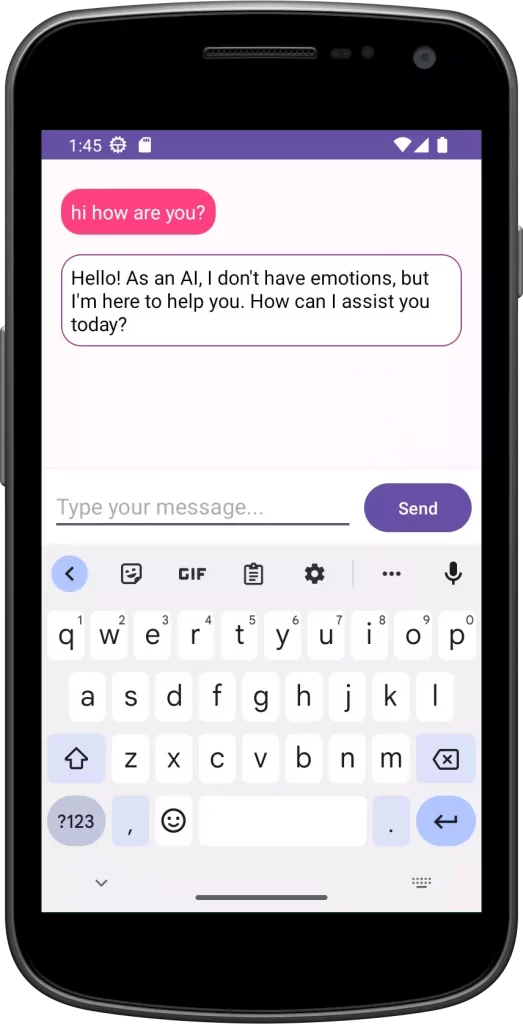
Step 10: Run app and see output
Note: Replace “YOUR_SECRET_KEY” with your actual OpenAI API secret key.

Conclusion
In conclusion, building an Android app to chat with GPT-3 or OpenAI’s language models is a journey that merges the realms of artificial intelligence and user interaction. Throughout this article, we explored the step-by-step process of creating such an app, from setting up API integration to designing an engaging user interface. In this example, we use the “gpt-3.5-turbo” engine/model to generate text based on the given prompt.
By harnessing the power of GPT-3 or OpenAI’s language models, developers can create chat applications that simulate human-like conversations, providing users with a seamless and immersive experience. The integration of advanced AI capabilities opens the door to endless possibilities, from creative writing assistants to language translation tools and intelligent chatbots.
Please Subscribe Youtube| Like Facebook | Follow Twitter Mens Winter Single Breasted Big Pockets Mid Long Casual Coats
 Mens Contrast Patchwork Flap Pocket Decoration Short Sleeve T-Shirts
 Orange Pi 800 Development Board 4GB RAM 64GB
 Mens Casual Corduroy Hooded Button Pocket Comfy Shirts
 E500 1.83 inch HD Screen ECG Monitor Heart Rate Blood Pressure
 35L Outdoor Backpack Men Women Waterproof Travel Trekking Backpack
 Home Steam Sauna Box Steam Room Fumigation Machine Steam Sauna Bath Sauna Heater
 GPD WIN Max 2 LPDDR5 32GB RAM 2TB SSD AMD R7 6800U Windows 11 Gaming Notebook 10.1 Inch Laptop Portable Game Computer Handheld Game Console US Plug
 SKYLOONG GK64X GK64XS Keyboard Kit RGB Hot Swappable 60% Programmable bluetooth Wired Case Customized Kit PCB Mounting Plate Case with Replacable Space Key